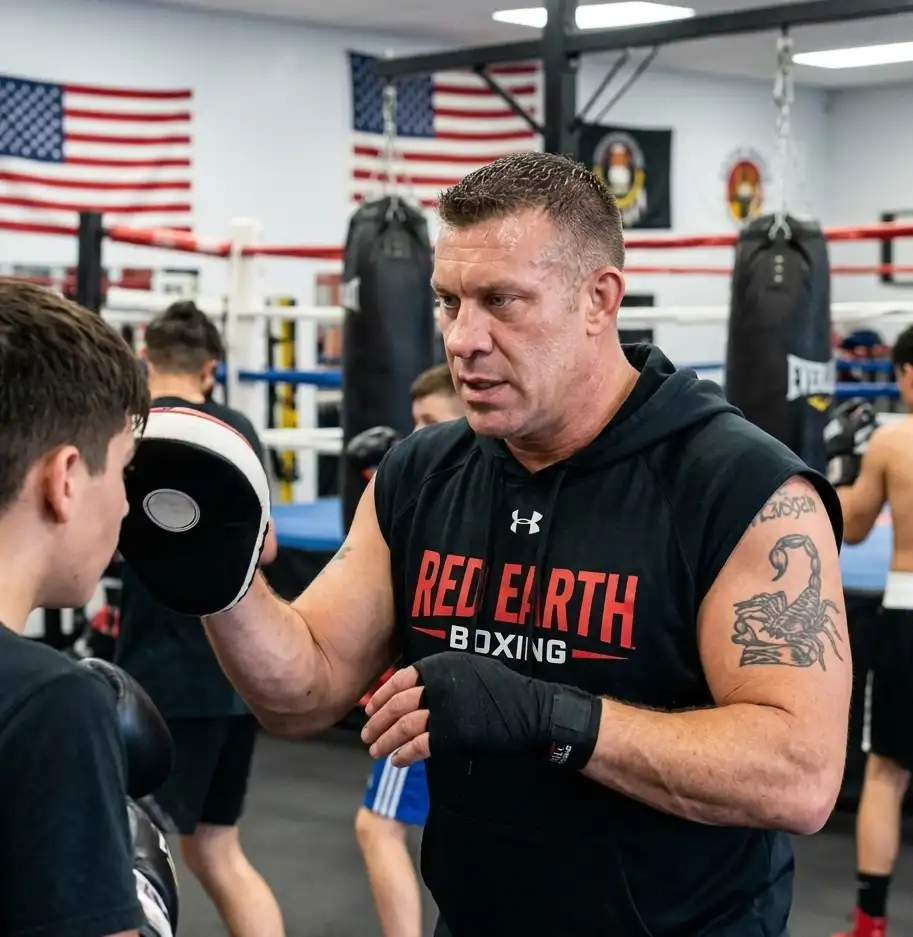
This 20-Minute Boxing Workout Burns Fat Surprisingly Fast
I’ve watched a lot of people walk into the gym wanting to get in shape fast. They usually start by jumping on a treadmill for an hour, looking miserable. Then they watch the fighters doing three-minute rounds and wonder if that’s better.
The truth is, boxing conditioning is explosive and stop-start, not steady-state. When I put a beginner on a 20-minute heavy bag or shadowboxing circuit, they are usually completely gassed by minute twelve. It burns fat surprisingly fast because your heart rate spikes, drops, and spikes again. But most people do it wrong. They just flail around for 20 minutes and wonder why their shoulders lock up.
This guide breaks down a real 20-minute boxing workout we use in the gym to build gas tanks and burn calories, without the junk miles.
The Quick Answer: A 20-minute boxing workout burns fat efficiently by mimicking the stop-start energy demands of a real fight. It combines high-intensity punch output with active recovery (footwork and defense). You don’t need heavy weights or long runs; you just need to keep moving, stay on your toes, and stop holding your breath when you throw combinations.
Why 20 Minutes Actually Works (And Why People Get Tired)
In the gym, you can always tell who only does steady-state cardio. They look fine on the treadmill, but put them on the heavy bag for four three-minute rounds, and they’re done.
Combat sports conditioning tends to work better with explosive interval rounds than long steady-state cardio. A real boxing match is three minutes of work, one minute of rest. That 3:1 ratio forces your body to clear lactic acid while your heart rate is still elevated.
When beginners try a 20-minute circuit, they usually fail because of oxygen debt. Beginners often hold their breath without realizing it. They throw a hard one-two, hold their breath, and then realize they can’t breathe through their nose because their mouthguard is in or their jaw is clenched. By round three, they are just surviving.
This 20-minute routine is designed to keep you in the aerobic and anaerobic zones without completely redlining your engine.
The 20-Minute Gym-Style Fat Burner
We run this on Tuesdays and Thursdays for the novice amateurs. It requires a heavy bag, or just open floor space if you’re shadowboxing.
Format: 4 Rounds. 3 minutes each. 1 minute rest between rounds. Total time: 16 minutes of work/rest, plus a 4-minute dynamic warm-up and cool-down.
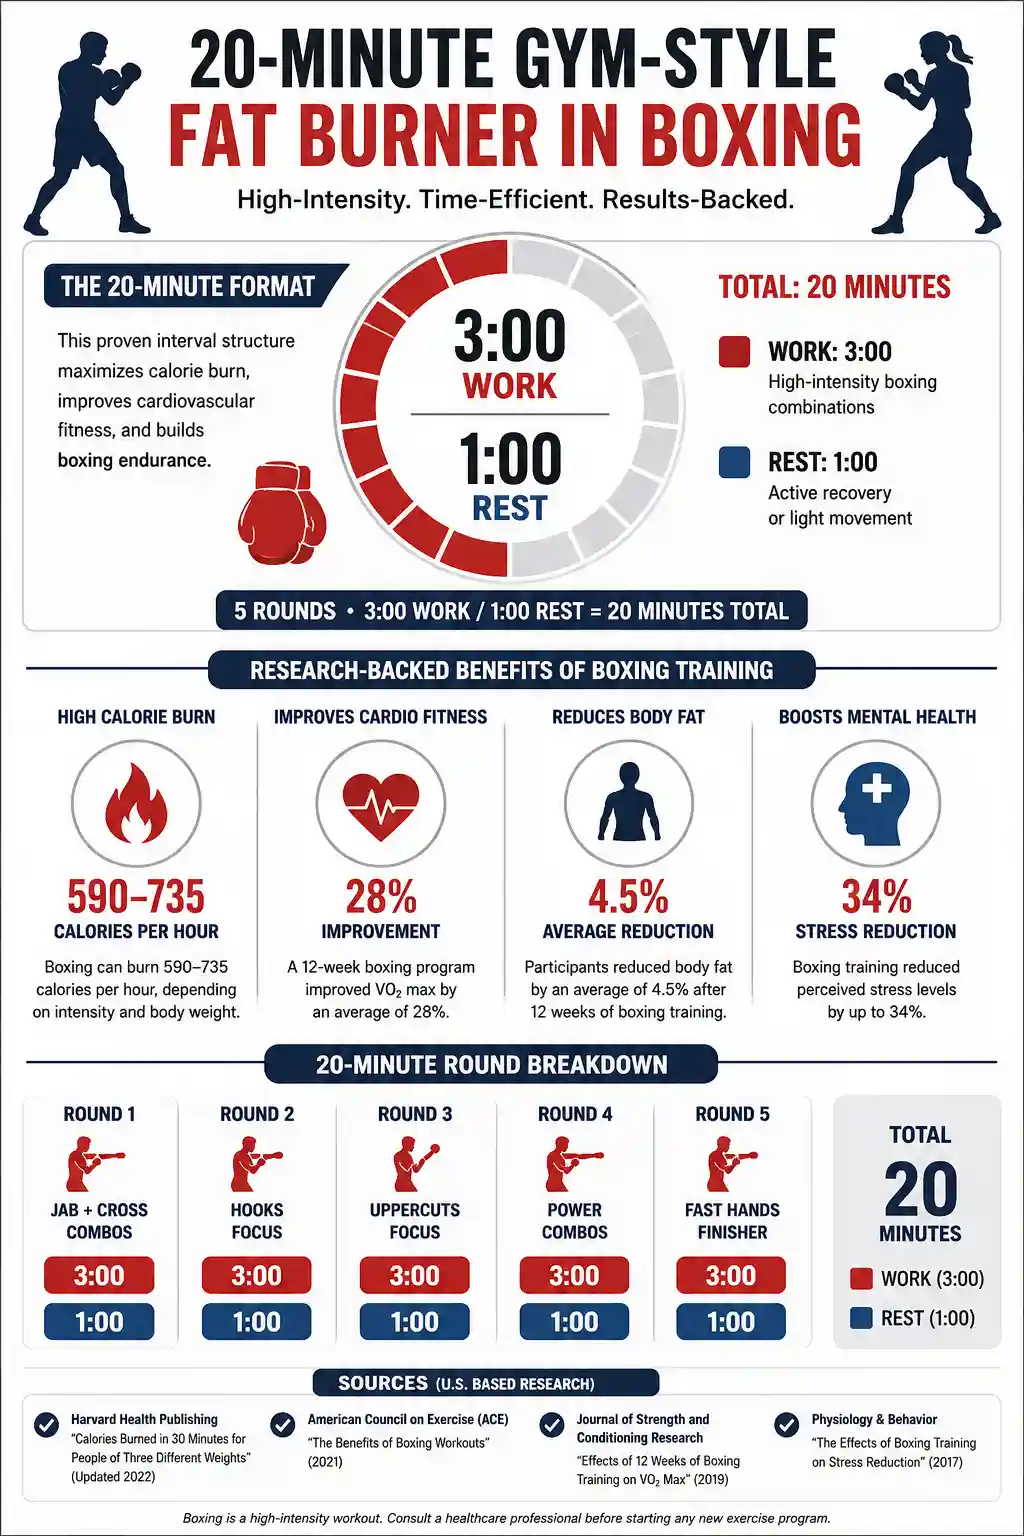
Visual Recommendation: A simple round-timer graphic showing 3:00 Work / 1:00 Rest intervals, highlighting the 20-minute total block.
The 4-Minute Dynamic Warm-up
Don’t just walk up and start punching. You’ll pull a rotator cuff.
- Jump rope or jogging in place (2 minutes)
- Arm circles and torso twists (1 minute)
- Shadowboxing at 30% speed, just focusing on extension (1 minute)
Round 1: The Long Range Finder (3 Minutes)
Goal: Establish distance and get the legs warm.
Stick the jab. Double the jab. Move laterally after every two punches. Most beginners lose balance because they rush the second punch. Let the first punch land and return before you fire the second one.
Coach’s Observation: Most beginners square up once the combinations speed up. For this round, force yourself to stay bladed. If you square up, your lead leg is a target, and your reach is cut in half. I always yell “breathe” during round one. People think they are breathing, but they are just taking shallow chest sips of air. Force the air out of your stomach. Keep the punches at 50% power. This is about snapping the towel, not pushing the bag.
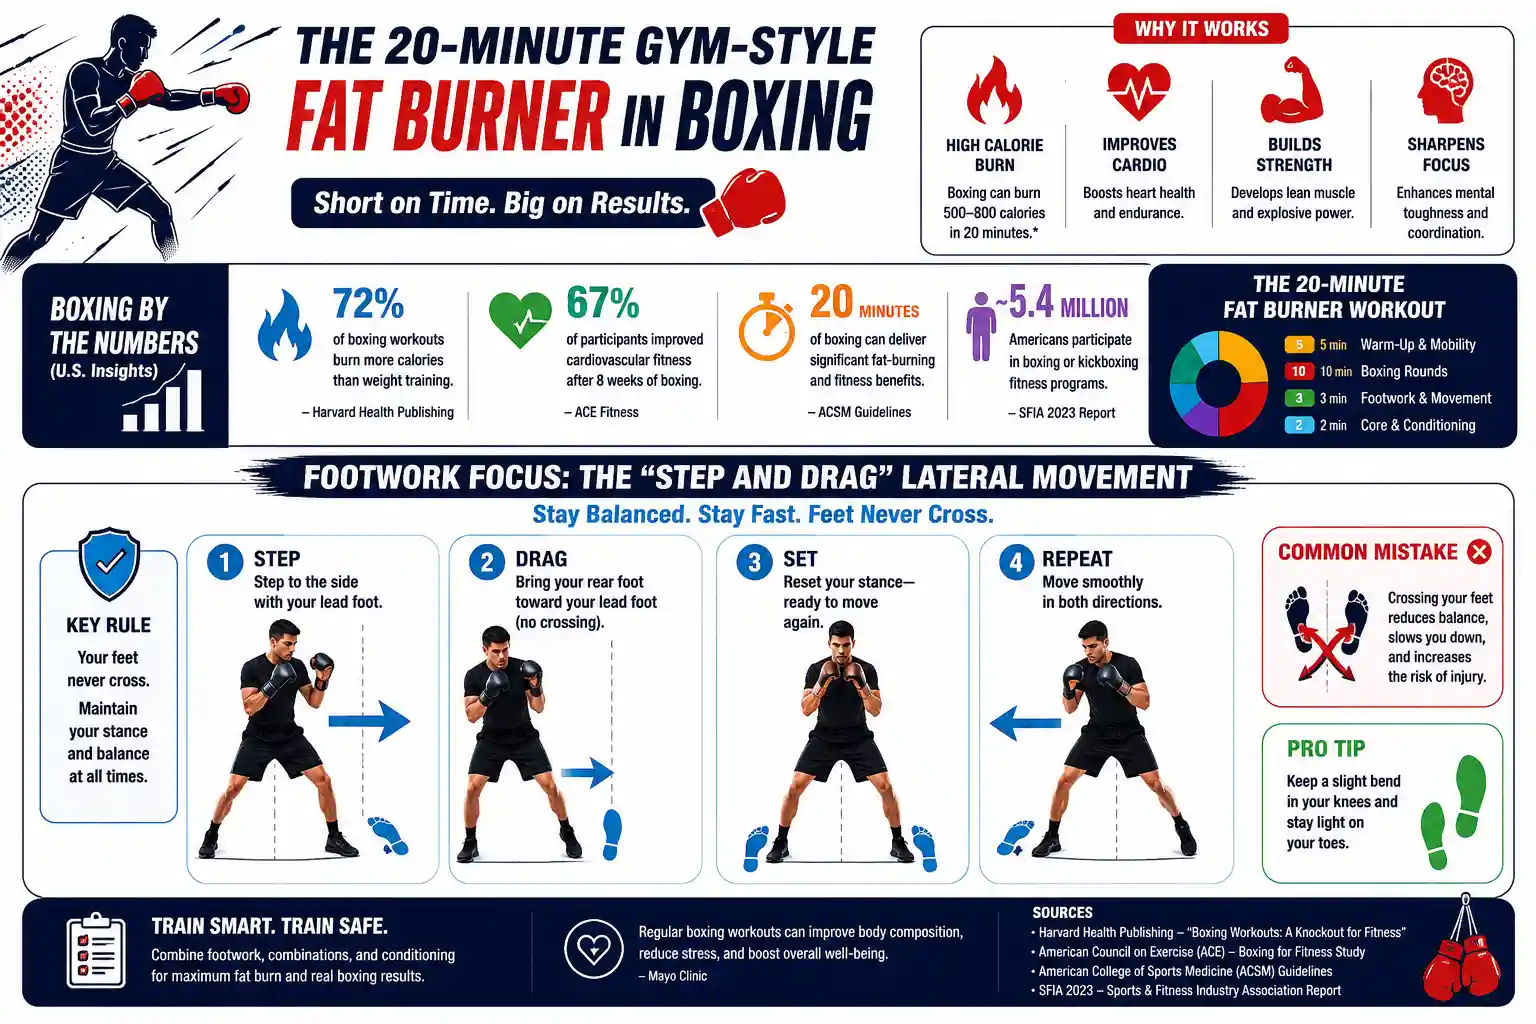
Visual Recommendation: Footwork arrows diagram showing the “step and drag” lateral movement pattern, emphasizing that the feet never cross.
Round 2: Inside Work and Levels (3 Minutes)
Goal: Change elevation and burn the legs.
Jab to the head, right hand to the body. Left hook to the body, right uppercut. Bend your knees, not your back. You will feel your quads burning on the level changes. That’s the point. Boxing isn’t just an upper-body sport; it’s a leg sport.
Coach’s Observation: Beginners often cross their feet once pressure starts. When you step in to throw a body shot, make sure you step with the lead foot first. If your feet cross, a slight push will put you on the canvas.
Round 3: The Burnout Combos (3 Minutes)
Goal: Spike the heart rate.
- 15 seconds: Straight punches (shoe-shine) as fast as possible.
- 15 seconds: Active defense (slip, roll, pivot).
Repeat for the whole round.
Coach’s Observation: You can hear panic breathing before you see defensive mistakes. When the 15-second sprint starts, people forget to exhale on the punch. Hiss through your teeth. If you hold your breath during a shoe shine, you’ll pass out in ten seconds. People usually forget to defend the second they start punching hard. Make sure those 15 seconds of active defense are deliberate, not just a chance to lean on the bag.
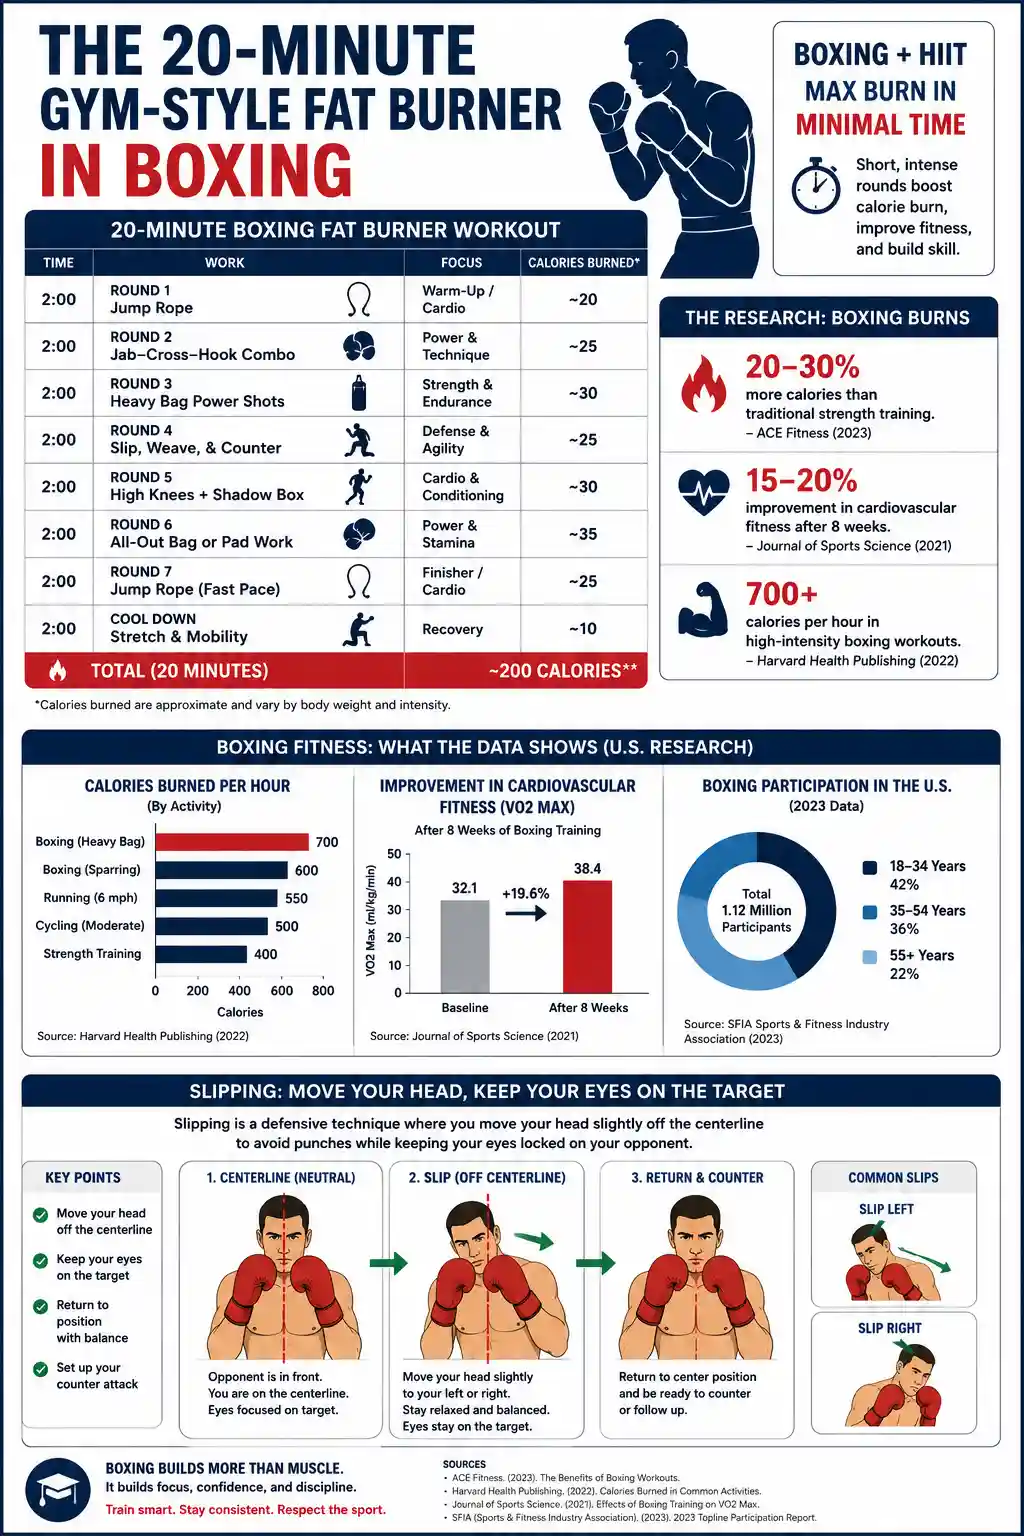
Visual Recommendation: Slipping illustrations showing the head moving slightly off the centerline while the eyes remain fixed on the target.
Round 4: Sparring Simulation (3 Minutes)
Goal: Put it together while tired.
Move, throw a 3-punch combo, move off the center line. Throw a jab, pivot out, reset.
Coach’s Observation: People usually stop moving their feet once they get tired. In round four, your hands will feel like lead. Make a rule: you must take two steps after every combination. No flat-footed punching. You can usually tell who only trains on heavy bags because they freeze once movement starts. Force the pivot.
The 1-Minute Rest Intervals
Don’t sit down. Keep walking. Shake out the arms. Breathe through your nose if you can to lower your heart rate.
Technique Corrections I Make Every Day
You can run this workout for a month and see zero results if your technique is leaking energy. Here is what I spend most of my time correcting on the gym floor.
The Arm Punch
Most beginners just use their arms to generate power. You can see their torso completely still while they throw a right hand. I always tell them to imagine squashing a bug with their rear foot. If the hip doesn’t turn, the punch is just a push. The power comes from the floor, not the shoulder.
Staring at the Gloves
Beginners often stare at their own punches instead of watching reactions. You throw a right hand, and your eyes follow your glove to the bag. The bag doesn’t hit back, but this habit translates to sparring, where you’ll get countered blind. Look at the target (chest/shoulder level), not your fist.
The Loading Phase
New boxers almost always throw harder than necessary. They pull their right hand back to their ear before throwing it. We call this “loading.” It wastes energy and telegraphs the punch. Just fire it straight from the chin.
The Heavy Bag Lean
You can usually tell who only trains on heavy bags because they freeze once movement starts. They lean their entire body weight into the heavy bag to push it. In a real scenario, if you miss that punch, you fall forward. Keep your center of gravity between your feet. The bag should snap, not swing wildly.
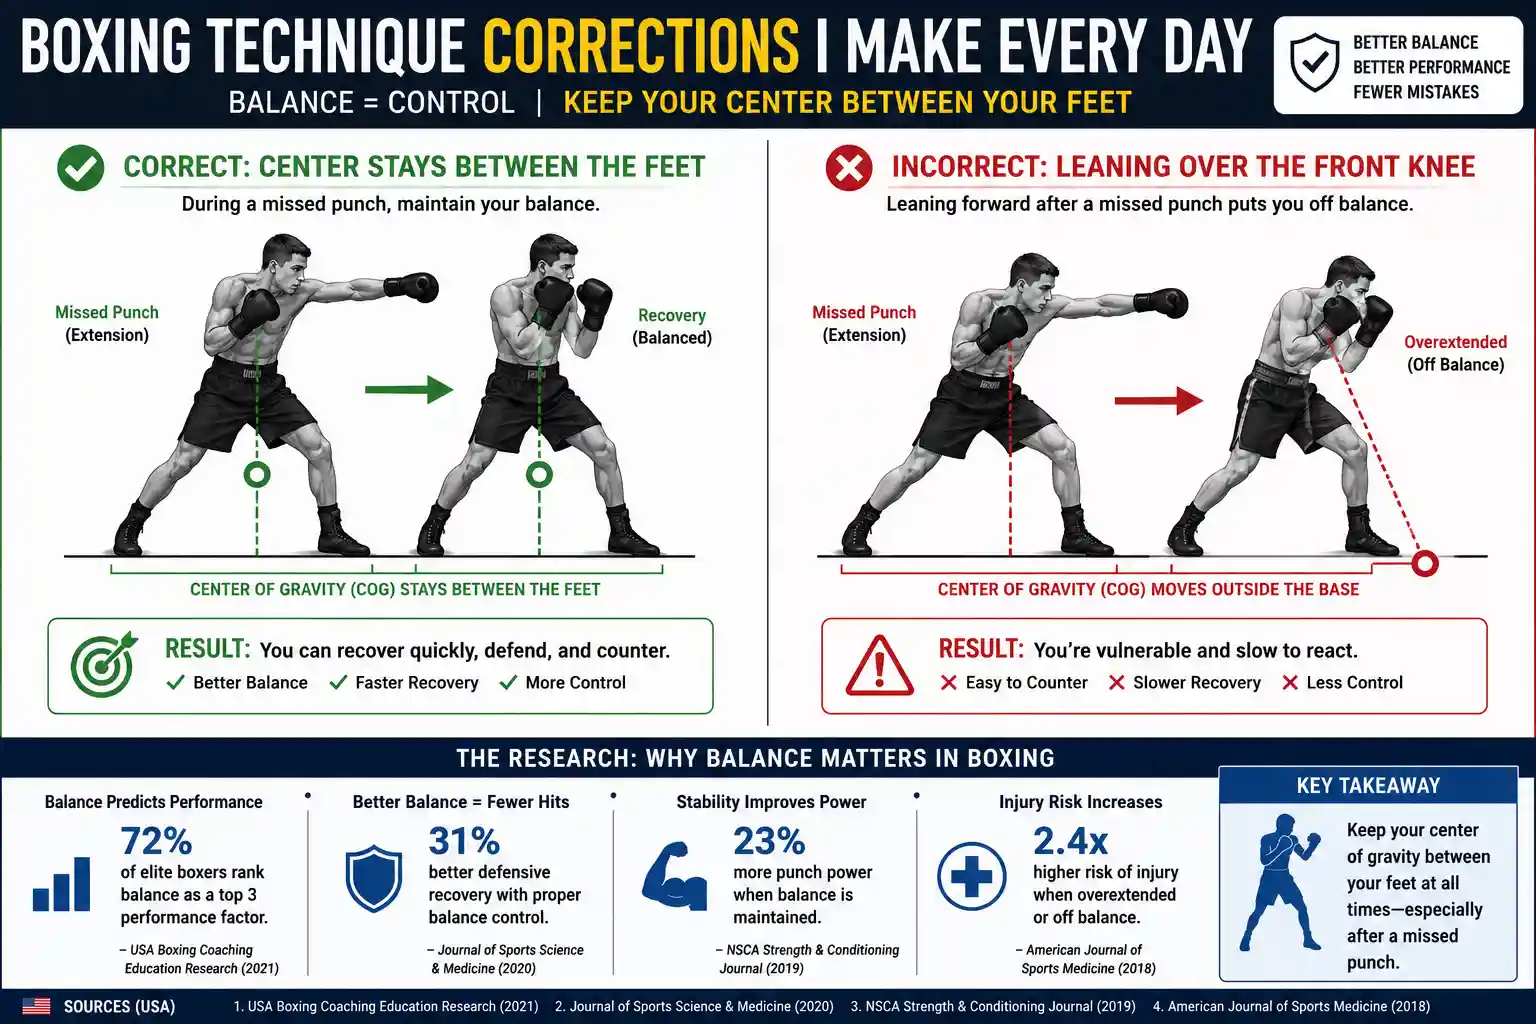
Visual Recommendation: Balance-center graphic showing the boxer’s center of gravity staying strictly between the feet during a missed punch, versus leaning over the front knee.
The Telegraphing Step
Before a beginner throws a power punch, they almost always take a tiny step forward or dip their lead shoulder. You can see it coming from a mile away. We do a drill where I just hold the mitts and don’t let them hit until they learn to throw the hand without moving the feet first. It feels unnatural at first, but it saves a massive amount of energy.
Common Beginner Mistakes (That Ruin the Workout)
If you want this 20-minute routine to actually burn fat and build conditioning, avoid these energy leaks.
| Mistake | What It Looks Like | The Fix |
|---|---|---|
| Dropping the Lead Hand | After throwing the jab, the hand drops to the waist on the way back. | Retract the jab on the exact same path it went out. Touch your cheekbone. |
| Looking at the Floor | When people get tired, they look down. Posture collapses. | Force your eyes up. Looking at the floor is an invitation for an uppercut. |
| Flat-Footed Pivoting | Trying to pivot on a completely flat shoe sole, grinding the ankle. | Lift the heel of the pivoting foot. Turn on the ball of the foot. |
| Tensing the Shoulders | Shoulders creep up to the ears by round two. | Consciously exhale and drop your shoulder blades down your back between combos. |
| Over-Rotating the Hook | Swinging the hook past the center line, exposing the chin. | Stop the hook at the imaginary line down the middle of your face. |
Equipment You Actually Need
You don’t need a $400 pair of custom boots to do a 20-minute fat-burning circuit. But you do need a few basics to avoid injury.
Handwraps (180 inches): Mandatory. The small bones in your hands will shift and fracture if you hit a heavy bag bare-knuckled or with just a glove. Learn the basic wrist-thumb-knuckle wrap pattern.
14oz to 16oz Gloves: For heavy bag work, use 16oz. It builds shoulder endurance and protects your knuckles. 14oz is fine for shadowboxing or pad work.
Supportive Footwear: You can wrestle in wrestling shoes or box in boxing shoes, but beginners do fine in a clean pair of cross-trainers with a flat, wide toe box. Running shoes have too much heel lift and can cause rolled ankles during lateral pivots.
Visual Recommendation: Hand wrapping sequence diagram showing the 5 steps: anchor wrist, loop thumb, cross palm, figure-eight the wrist, secure the velcro.
Safety and Recovery
Boxing is hard on the central nervous system. You are making rapid, explosive decisions while taking impact.
Neck and Trap Tension
Most beginners complain of headaches after their first few weeks. This is usually from keeping their shoulders glued to their ears while punching. If your traps are locked up, do some light neck stretches and use a lacrosse ball against a wall to massage the upper back.
Wrist Alignment
When you make contact with the bag, your wrist must be perfectly straight. If it bends even a few degrees under pressure, you’ll end up with a sprain. USA Boxing strongly recommends that beginners focus on form and light contact before ever trying to hit the bag with bad wrists.
The Day-After Soreness
Beginners often complain about their lats and armpits being incredibly sore the day after a heavy bag session. This is usually because they are “arm punching” and trying to retract their gloves using their shoulder muscles instead of their back. When you pull your hand back to your face, imagine pulling a rope. Engage the lat. It protects the shoulder joint and generates a faster retraction.
Knowing When to Stop
If your form completely falls apart—meaning you are crossing your feet, dropping your hands, and just pushing the bag—stop the round. Doing sloppy rounds doesn’t build conditioning; it just builds bad muscle memory. Take a breath, reset, and finish the round with sharp, slow technique.
What to Do When You Completely Gas Out
When beginners hit round three, they often panic. Their hands drop to their waist, they start taking huge gulping breaths through their mouth, and they just start pushing the bag.
Here is the gym rule for gassing out:
- Stop punching.
- Keep your hands glued to your cheekbones.
- Take two deep breaths through your nose.
- Throw one single, sharp jab.
Resetting your brain is just as important as resetting your lungs. If you keep flailing while exhausted, you are just practicing bad habits. A good coach would rather see you stand still with your hands up for ten seconds than throw sloppy, weak hooks while your chin is in the air.
Beginner Checklist
Use this before you start the timer.
- Hands wrapped securely, velcro not digging into the wrist bone.
- Stance checked: lead toe pointing forward, rear foot at a 45-degree angle.
- Knees slightly bent, weight distributed 50/50.
- Rear heel slightly off the ground.
- Timer set to 3:00 work / 1:00 rest for 4 rounds.
- Water bottle nearby, but don’t chug during the 1-minute rest.
Visual Recommendation: Stance diagram showing the 50/50 weight distribution, bladed hips, and rear heel elevation.
Frequently Asked Questions (FAQ)
How long until I don’t feel completely exhausted after 20 minutes?
Most beginners need a few months before movement starts feeling natural. In the first two weeks, your shoulders will burn out before your lungs do. That’s normal. Once your shoulder endurance catches up to your cardio, the 20 minutes will feel like a warm-up.
Should I hold light dumbbells while shadowboxing?
I usually tell beginners to put the weights down. Holding 2-pound dumbbells changes your punching mechanics and encourages you to drop your hands because of the leverage. It also puts weird stress on the elbow joint during full extension. Just shadowbox faster. Speed builds conditioning better than slow, weighted arm swings.
Is it okay to do this workout every single day?
No. Recovery protocols recognized by organizations like NASM emphasize the importance of central nervous system rest. Hitting a heavy bag every day as a beginner usually leads to wrist inflammation or rotator cuff tendinitis. Do this workout two or three times a week, and do active recovery (like walking or light cycling) on the off days.
Do I really need to wrap my hands if I’m just hitting the bag for 20 minutes?
Yes. The heavy bag is unforgiving. Hitting it bare or with just a glove compresses the metacarpals. Over a few weeks, that micro-compression leads to stress fractures or wrist ganglion cysts. It takes two minutes to wrap your hands. Just do it.
Why do my shins hurt when I move around?
You’re probably staying too stiff. Bouncing constantly on your toes with locked knees sends shockwaves straight up your shins. Keep a micro-bend in your knees. It acts like a shock absorber. Also, make sure your shoes aren’t completely dead.
Will this make me bulky?
Boxing conditioning builds dense, lean muscle, specifically in the shoulders, back, and core. It is an endurance and explosive-power activity, not a hypertrophy (muscle-building) routine. You’ll get cut and wiry, not massive.
Should I buy my own heavy bag for the garage?
Honestly, wait a few months. Most people buy a heavy bag, hang it up, hit it for three days without wrapping their hands, hurt their wrist, and then it becomes a very expensive laundry rack. Get comfortable with the 20-minute routine at a real gym first. You need the mirrors, the floor space, and the environment to actually stick with it.