How to Start Boxing at Home in 2026: A Beginner’s Step-by-Step Guide
The first time I tried shadowboxing in my garage, I threw a “perfect” jab-cross combo, felt great about it, then immediately stepped forward into empty air and nearly face-planted into a stack of old tires. My footwork was stiff. My breathing was ragged after thirty seconds. And when I tried to slip an imaginary punch? I just kind of… ducked awkwardly and lost my balance.
That’s the reality nobody shows you in the highlight reels. Boxing looks fluid on screen. In practice, especially when you’re starting alone at home, it feels clumsy, frustrating, and surprisingly exhausting. But here’s the thing: that awkwardness is normal. Every fighter who’s ever laced up gloves started exactly where you are right now.
I’ve spent over fifteen years in boxing gyms from gritty amateur clubs in Philly to professional camps in LA, and the biggest mistake I see beginners make isn’t lack of talent. It’s rushing. They skip stance work to throw power shots. They ignore footwork to practice combos. They burn out in two weeks because they trained like they were already fight-ready.
This guide isn’t about “unlocking your inner warrior” or “revolutionary home workouts.” It’s about the unglamorous, practical steps that actually build a foundation. No fluff. No fake expertise. Just what works, based on what I’ve seen, helps real beginners progress—whether they eventually step into a gym or just want to train smart at home.
Quick Answer: What Actually Matters When Starting Boxing at Home
- Core technique first: Master your stance and jab before worrying about combos or power. Everything builds from there.
- Biggest beginner mistake: Trying to do too much, too fast. You’ll develop bad habits that take months to fix.
- What matters most: Consistency over intensity. Ten minutes of focused stance work daily beats a two-hour sloppy session once a week.
- Realistic expectations: Expect awkwardness for the first 4-6 weeks. Your body is learning new coordination patterns. That’s normal.
- Training difficulty: Boxing is technically demanding. It’s not just “hit the bag.” Patience and deliberate practice are non-negotiable.
What Home Boxing Training Actually Feels Like (The Unfiltered Truth)
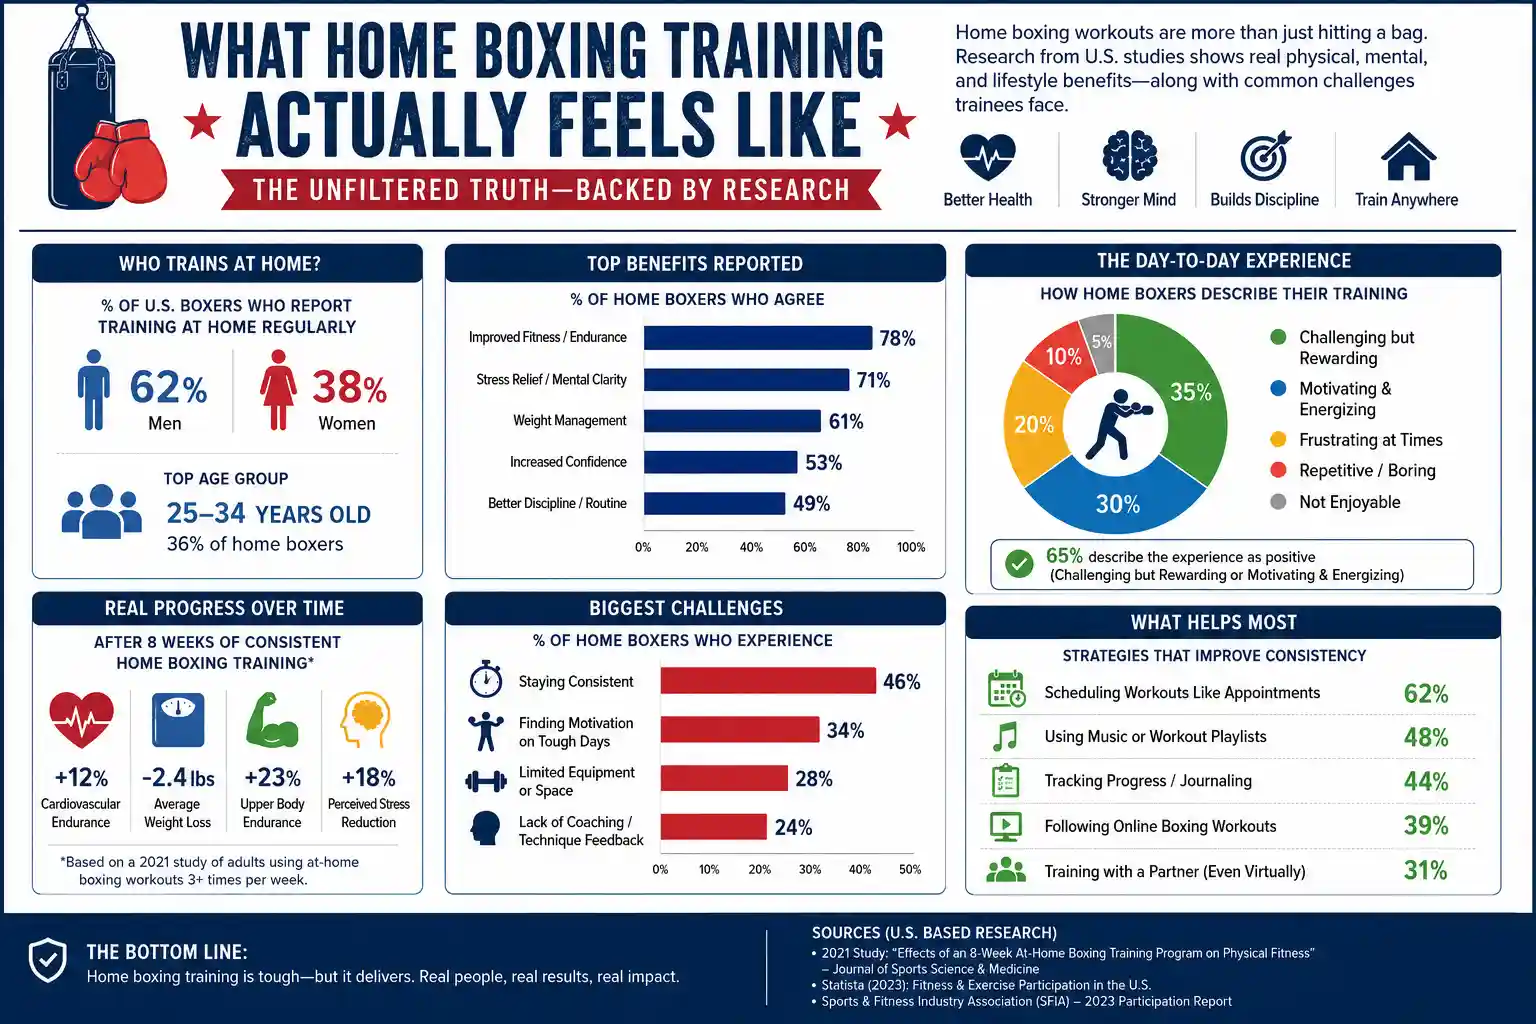
Let’s be honest: training in boxing at home without a coach or partners is hard. Not impossible—just hard. Here’s what you’ll likely encounter:
The Fatigue Factor
Your first few rounds of shadowboxing will feel ridiculous. You’ll get winded after 45 seconds. Your shoulders will burn. That’s not because you’re “out of shape”—it’s because boxing uses muscles and energy systems in ways most workouts don’t. Your body isn’t inefficient; it’s just unfamiliar. Don’t panic. This normalizes within 3-4 weeks of consistent practice.
Footwork Feels Weird at First
Beginners often stomp, shuffle, or cross their feet when trying to move. I’ve watched countless new fighters in gyms do this. At home, without a coach correcting you, it’s easy to reinforce the mistake. Slow down. Practice moving just six inches forward and back. Record yourself on your phone. Watch it back. You’ll spot the issues immediately.
Timing Is Invisible (Until It Isn’t)
Jab timing isn’t just about throwing fast. It’s about launching when your opponent is committed, or when their guard shifts. At home, you don’t have a live target. So you’ll develop a rhythm that feels good—but might not work against resistance. Solution: Use a mirror or phone camera to check if your jab retracts as fast as it extends. That’s the detail that separates a “punch” from a “boxing jab.”
Defensive Breakdowns Under Fatigue
When you’re fresh, keeping your hands up is easy. When you’re gassed? Your guard drops. Your head stays still. You start blinking when you should be slipping. This happens to everyone. At home, simulate fatigue: do 20 jumping jacks, then immediately practice your defensive slips. Train the skill under stress, even if the stress is self-induced.
The Sparring Anxiety (Even Imaginary)
Before my first live sparring session, I was nervous. Not “excited nervous”—”what if I freeze” nervous. When you train alone, it’s easy to avoid that mental component. Don’t. Visualize an opponent. Imagine them countering your jab. Practice staying calm when your imaginary pressure increases. Ring IQ starts in your head long before you step between ropes.
How to Actually Learn: A Realistic Progression
Improvement in boxing isn’t linear. Some days you’ll feel like you’ve regressed. That’s part of the process. Here’s a practical, week-by-week flow that respects the learning curve:
Weeks 1-2: Foundation Only
Focus: Stance, basic footwork, single jab.
Reality check: You’ll feel awkward. Your stance will feel unnatural. Your jab will feel weak. That’s expected. Spend 80% of your time here. Record short clips daily. Compare day 1 to day 14. Small improvements will be visible.
Common frustration: “I’m not throwing combos yet?” Correct. Combos built on a shaky foundation just cement bad habits. Trust the process.
Weeks 3-4: Adding Layers
Focus: Jab-cross (1-2), basic head movement (slips), defensive guard retention.
Reality check: Your coordination will feel challenged. You might stumble when trying to slip and counter. Your breathing will get ragged faster. This is your body adapting. Keep sessions short (15-20 mins max of technical work).
Beginner mistake: Adding power too soon. Speed and power come after mechanics. Throw at 30-40% power until your form is consistent.
Weeks 5-8: Integration & Conditioning
Focus: Simple combos (1-2, 1-1-2), pivot footwork, basic feints, round-based conditioning.
Reality check: This is where many beginners plateau or quit. The novelty wears off. The work gets harder. Your progress feels slower. Push through. This is the filter. Consistency now separates those who stick with boxing from those who don’t.
Conditioning note: Don’t just do generic HIIT. Boxing conditioning is specific: 3-minute rounds, 1-minute rest, mixing technical drills with light movement. Start with 2-3 rounds. Build slowly.
What “Good” Looks Like at Each Stage
Don’t compare yourself to pros. Compare yourself to last week. “Good” means:
- Week 2: You can hold your stance for 30 seconds without shifting weight awkwardly.
- Week 4: Your jab retracts to your chin automatically, not as an afterthought.
- Week 8: You can throw a 1-2 while moving backward without losing balance.
Small wins. Stack them.
What To Practice First: Your Home Boxing Priority List
If you only have 15 minutes a day, spend it in this order. This is what I tell every beginner who walks into my gym:
Stance & Balance (3 mins): Feet shoulder-width, lead foot slightly forward, knees soft, hands up, chin tucked. Practice shifting weight slightly forward/back without crossing feet.
Footwork Patterns (4 mins): Forward, back, lateral steps. Small, controlled movements. No bouncing. Imagine you’re on thin ice.
Single Jab (4 mins): Extend, snap back. Focus on retraction speed. Keep your other hand glued to your cheek.
Basic Defense (4 mins): Practice slipping an imaginary jab. Just move your head 2-3 inches off the centerline. Keep your eyes open. Keep your hands up.
That’s it. Master this loop before adding anything else.
Most Common Errors (And How to Fix Them at Home)
| Mistake | Why It Happens | Quick Fix |
|---|---|---|
| Dropping the rear hand when jabbing | Overreaching for power; lack of shoulder endurance | Shadowbox in front of a mirror. Keep a tennis ball tucked under your rear armpit. If it drops, you’re dropping your hand. |
| Flat-footed movement | Trying to move too fast; not bending knees | Practice moving while holding a light squat. Record yourself. Watch for heel lift and knee bend. |
| Telegraphing punches | Pulling the hand back before throwing, shoulder tension | Throw punches from your guard position only. No wind-up. Imagine your elbow is on a rail. |
| Holding breath during combos | Nervous tension; lack of breathing rhythm | Exhale sharply on each punch. Say “shh” or “tss” out loud. Make it a habit. |
| Over-rotating on crosses | Trying to generate power from arms, not hips | Practice the cross with your feet glued to the floor. Feel the hip rotation. Then add small steps. |
Simple Drill List for Home (No Equipment Needed)
Mirror Drill: 3 rounds of 2 mins. Shadowbox in front of a mirror. Focus on one cue per round (e.g., “hands up,” “small steps,” “jab retraction”).
Wall Slip Drill: Stand 6 inches from a wall. Practice slipping side to side without touching it. Teaches head movement control.
Timer Rounds: Use a free boxing timer app. 3 mins work, 1 min rest. Alternate technical rounds (slow, focused) with movement rounds (light footwork, defense only).
Recording Review: Once a week, record a 2-minute shadowboxing clip. Watch it back. Note one thing to improve next week.
How Long Does It Actually Take To Improve?
Real talk: Boxing is a marathon. But you’ll feel progress if you’re consistent.
2 weeks: Stance feels less awkward. Jab retraction improves.
4-6 weeks: Basic combos feel more coordinated. Footwork is smoother.
8-12 weeks: You can maintain technique under mild fatigue. Defensive reactions become more automatic.
6+ months: You start to “feel” distance and timing. Ring IQ develops. You can self-correct mid-drill.
These timelines assume 3-4 focused sessions per week, 20-30 minutes each. Less consistency = slower progress. No shortcuts.
Key Concepts to Understand (Without the Jargon Overload)
You’ll hear these terms in boxing. Here’s what they actually mean for a beginner training at home:
Jab timing: It’s not about speed. It’s about throwing when your opponent is least ready. At home, practice jabbing as you step in, then as you step back. Feel the difference in balance and recovery.
Head movement: Slipping isn’t ducking. It’s a small, efficient shift off the centerline. Practice against a wall (see drill above). Keep your eyes on the “target.”
Pivot footwork: Rotating on your lead foot to change angles. Critical for defense and setting up counters. Start by pivoting 45 degrees after a jab. Keep your weight balanced.
Shoulder roll: A defensive technique where you use your lead shoulder to deflect jabs. Advanced, but understanding the principle helps: defense isn’t just blocking; it’s redirecting. Don’t try to master this early. Just know it exists.
Ring IQ: Fight sense. Knowing when to press, when to retreat, when to counter. Develop this by visualizing scenarios during shadowboxing. “If they rush me, I pivot. If they back up, I cut the ring.”
Counter punching: Hitting as they hit. Requires timing and calmness. At home, practice slipping an imaginary jab and immediately firing your own. Start slow. Speed comes later.
Defensive guard: Keeping your hands up isn’t enough. Your guard should be active—slightly adjusting to block angles, not just parked on your face. Practice “high guard” and “peek-a-boo” positions in the mirror.
Distance control: Managing the space between you and an opponent. At home, imagine a target at arm’s length. Practice stepping just outside that range, then exploding in. This is subtle but vital.
Feints: Fake movements to draw reactions. Start simple: a slight shoulder dip before your jab. Don’t overdo it. Feints work because they’re subtle, not theatrical.
Conditioning rounds: Boxing fitness isn’t generic cardio. It’s sport-specific: 3-minute rounds of mixed activity (footwork, punches, defense), 1-minute rest. Build your engine to match the demands of the sport.
The Mental Side: Frustration, Fear, and Small Wins
I won’t sugarcoat it: starting boxing is humbling. You’ll have sessions where nothing feels right. Your feet feel heavy. Your hands drop. You forget the combo you just practiced. That’s not failure. That’s learning.
The first time I tried to slip a jab during live sparring, I moved straight into a right hand and spent the rest of the round realizing how different boxing looks once someone is actually punching back. That moment of panic—when your brain freezes, and your body doesn’t respond—is universal. At home, you can simulate that pressure: set a timer for a “pressure round” where you imagine an aggressive opponent. Practice staying calm. Breathe. Reset.
Conditioning exhaustion is real. There were days I wanted to quit mid-round because my lungs were burning and my legs felt like lead. What kept me going wasn’t motivation; it was routine. Showing up even when I didn’t feel like it. That’s the secret no one talks about: boxing rewards consistency more than talent.
And the fear before your first sparring session? It never fully goes away. Even pros feel it. But confidence grows not from avoiding fear, but from preparing for it. Every focused shadowboxing round, every footwork drill, every time you correct your guard in the mirror—you’re building the competence that quiets the fear.
The awkward early phases? They’re necessary. Your nervous system is wiring new patterns. Embrace the clumsiness. It means you’re growing.
Learning From the Real World: Gyms, Trainers, and Fight Culture
I’ve been lucky to train under coaches who came up in the amateur ranks, guys who didn’t care about Instagram followers but cared deeply about fundamentals. One old-school trainer in Brooklyn used to say: “If your feet aren’t right, nothing else matters.” He’d make us spend entire sessions just moving, no punches allowed. It felt boring at the time. Now I understand: footwork is the foundation of everything in boxing.
Amateur boxing culture emphasizes discipline over flash. You’ll see fighters drilling the same jab for rounds on end. That’s not a lack of creativity; it’s mastery through repetition. When you train at home, adopt that mindset. Quality over quantity. One perfect jab is worth ten sloppy ones.
Watch professional fights with a critical eye. Don’t just watch the knockouts. Watch how fighters set up punches. Notice how they recover after missing. Observe their footwork when they’re tired. This is free education. But remember: pros have years of foundation. Don’t compare your chapter 1 to their chapter 20.
If you ever get the chance to visit a real boxing gym—even for a single session—do it. The energy, the sound of gloves on bags, the correction from a live coach… It’s irreplaceable. But until then, train smart at home. Respect the craft. Be patient with yourself.
Visual Aids That Actually Help (And How to Use Them)
Since you’re training at home, visuals are your best friend. Here’s what to look for or create:
Stance diagrams: Find a simple side-view and front-view image of a proper boxing stance. Print it or keep it on your phone. Reference it before each session.
Footwork movement charts: A simple grid showing forward/back/lateral steps with arrows. Practice moving along the lines. Helps prevent crossing feet.
Punch trajectory examples: Short video clips (from trusted sources) showing jab extension and retraction. Watch the shoulder and hip alignment, not just the fist.
Guard-position images: Compare high guard, peek-a-boo, and shoulder roll stances. Understand when each is used. Don’t try to master all at once.
Combination flow graphics: Simple number-based combo charts (1=jab, 2=cross). Start with 1-2. Master the weight shift before adding a third punch.
Pro tip: Use your phone to record yourself. Compare your form to reference visuals. Be your own coach. It’s not perfect, but it’s powerful.
Final Thoughts: Just Start, Stay Consistent, Trust the Process
You don’t need a fancy home gym. You don’t need expensive gear. You need a clear space, a mirror or phone camera, and the willingness to embrace the awkward early stages.
Boxing rewards patience. It rewards attention to detail. It rewards showing up when you don’t feel like it. The skills you build at home, balance, coordination, discipline, fight IQ, translate far beyond the sport. But more than that, they build a foundation that will serve you if you ever step into a real gym.
So start small. Master your stance. Throw one good jab. Move six inches without losing balance. Celebrate those micro-wins. Stack them day by day.
And when you get frustrated, and you will remember: every fighter you admire once stood where you are now. Clumsy. Out of breath. Figuring it out. The only difference is that they kept going.
Now it’s your turn. Lace up (metaphorically). Clear a space. And begin.
Disclaimer: This guide is for educational purposes. Boxing carries inherent risks. If possible, seek instruction from a qualified coach. Listen to your body. Stop if you feel pain (not to be confused with discomfort). Train smart.
About Neil Stephens
Neil Stephens is a National Academy of Sports Medicine (NASM) Certified Personal Trainer and a Certified USA Boxing Coach based in Los Angeles. With hands-on experience in boxing training, conditioning, and athletic performance, he focuses on helping readers understand practical boxing techniques, fitness strategies, and combat sports conditioning.
Neil is the author of Boxinges, also known as “Boxinges USA,” where he shares expert-backed content about boxing training, workouts, recovery, and sports performance. His content is built around accuracy, real-world coaching knowledge, and athlete-focused guidance to support beginners and experienced fighters alike.